Strings and Drawing Text
| Authors: | Daniel Shiffman; Arihant Parsoya (p5 port) |
|---|---|
| Copyright: | This tutorial is from the book Learning Processing by Daniel Shiffman, published by Morgan Kaufmann, © 2008 Elsevier Inc. All rights reserved. The tutorial was ported to p5 by Arihant Parsoya. If you see any errors or have comments, open an issue on either the p5 or Processing repositories. |
If you are looking to display text onscreen with Processing, you’ve got to first become familiar with the String class. Strings are probably not a totally new concept for you, it’s quite likely you’ve dealt with them before. For example, if you’ve printed some text to the message window or loaded an image from a file, you’ve written code like so:
print("printing some text to the message window!")      # Printing a String
img = load_image("filename.jpg")  # Using a String for a file name
Nevertheless, although you may have used a String here and there, it’s time to unleash their full potential.
Where do we find documentation for the String class?
Although technically a Python class, because Strings are so commonly used, Processing includes documentation in its reference: http://www.processing.org/reference/String.html.
This page only covers some of the available methods of the String class. The full documentation can be found on Python’s String page.
What is a String?
A String, at its core, is really just a fancy way of storing an array of characters. If we didn’t have the String class, we’d probably have to write some code like this:
sometext = ['H', 'e', 'l', 'l', 'o', ' ', 'W', 'o', 'r', 'l', 'd']
Clearly, this would be a royal pain in the Processing behind. It’s much simpler to do the following and make a String object:
sometext = "How do I make String? Type some characters between quotation marks!"
It appears from the above that a String is nothing more than a list of characters in between quotes. Nevertheless, this is only the data of a String. We must remember that a String is an object with methods (which you can find on the reference page.) This is just like how we learned in the Pixels tutorial that a PImage stores both the data associated with an image as well as the functionality: copy(), load_pixels(), etc.
For example, brackets [] returns the individual character in the String at a given index. Note that Strings are just like arrays in that the first character is index #0!
message = "some text here."
c = message[0]
print(c) # Results in 'e'
Another useful method is len(). This is easy to confuse with the length property of an array. However, when we ask for the length of a String object, we must use the parentheses since we are calling a function called len() rather than accessing a property called length.
message = "This String is 34 characters long."
print(len(message))
We can also change a String to all uppercase using the upper() method:
uppercase = message.upper()
print(uppercase)
Finally, let’s look at equals()`. Now, Strings can be compared with the “==” operator as follows:
one = "hello"
two = "hello"
print(one == two)
One other feature of String objects is concatenation, joining two Strings together. Strings are joined with the “+” operator. Plus, of course, usually means add in the case of numbers. When used with Strings, it means join.
helloworld = "Hello" + "World"
Variables can also be brought into a String using concatenation.
x = 10
message = "The value of x is: " + x
Displaying Text
The easiest way to display a String is to print it in the message window. This is likely something you’ve done while debugging. For example, if you needed to know the horizontal mouse location, you would write:
print(mouse_x)
Or if you needed to determine that a certain part of the code was executed, you might print out a descriptive message.
print("We got here and we're printing out the mouse location!!!")
While this is valuable for debugging, it’s not going to help our goal of displaying text for a user. To place text on screen, we have to follow a series of simple steps.
1. Declare an object for font
f = None
2. Create the font by referencing the font name and the function create_font()
This should be done only once, usually in setup(). Just as with loading an image, the process of loading a font into memory is slow and would seriously affect the sketch’s performance if placed inside draw(). When sharing a sketch with other people or posting it on the web, you may need to include a .ttf or .otf version of your font in the data directory of the sketch because other people might not have the font installed on their computer. Only fonts that can legally be distributed should be included with a sketch. In addition to the name of the font, you can specify the size as well as whether the font should be antialiased or not.
f = create_font("Arial.ttf", 16,) # Arial, 16 point, anti-aliasing on
3. Specify the font using text_font()
text_font() takes one or two arguments, the font variable and the font size, which is optional. If you do not include the font size, the font will be displayed at the size originally loaded. When possible, the text() function will use a native font rather than the bitmapped version created behind the scenes with create_font() so you have the opportunity to scale the font dynamically. When using P2D, the actual native version of the font will be employed by the sketch, improving drawing quality and performance. With the P3D renderer, the bitmapped version will be used and therefore specifying a font size that is different from the font size loaded can result in pixelated text.
text_font(f, 36)
4. Specify a color using fill()
fill(255)
5. Call the text() function to display text
This function is just like shape or image drawing, it takes three arguments—the text to be displayed, and the x and y coordinate to display that text.
text("Hello Strings!", (10, 100))
from p5 import *

f = None # STEP 1 Declare PFont variable

def setup():
        size(200,200)
        f = create_font("Arial", 16) # STEP 2 Create Font

def draw():
        background(255)
        text_font(f, 16)
        fill(0)
        text("Hello Strings!", (10,100))

if __name__ == '__main__':
        run()
Animating Text
Let’s look at two more useful Processing functions related to displaying text:
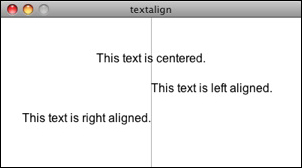
text_align()- specifies RIGHT, LEFT or CENTER alignment for text.
from p5 import *

f = None # STEP 1 Declare PFont variable

def setup():
        global f
        size(400,200)
        f = create_font("Arial.ttf", 16) # STEP 2 Create Font

def draw():
        global f
        background(255)

        stroke(175)
        line((width/2,0), (width/2,height))

        text_font(f)
        fill(0)

        text_align("CENTER")
        text("This text is centered.",(width/2,60))

        text_align("LEFT")
        text("This text is left aligned.", (width/2,100))

        text_align("RIGHT")
        text("This text is right aligned.", (width/2,140))

if __name__ == '__main__':
        run()
text_width()- Calculates and returns the width of any character or text string.
Let’s say we want to create a news ticker, where text scrolls across the bottom of the screen from left to right. When the news headline leaves the window, it reappears on the right hand side and scrolls again. If we know the x location of the beginning of the text and we know the width of that text, we can determine when it is no longer in view. textWidth() gives us that width.
To start, we declare headline, font, and x location variables, initializing them in setup().
headline = "New study shows computer programming lowers cholesterol."
f  # Global font variable
x  # horizontal location of headline

def setup():
        global f, x
        f = create_font("Arial",16) #Loading font
        x = width # initializing headline off-screen to the right
In draw(), we display the text at the appropriate location.
# Display headline at x  location
text_font(f, 16)
text_align("LEFT")
text(headline, (x,180))
We change x by a speed value (in this case a negative number so that the text moves to the left.)
x = x - 3
Now comes more difficult part. It was easy to test when a circle reached the left side of the screen. We would simply ask: is x less than 0? With text, however, since it is left-aligned, when x equals zero, it is still viewable on screen. Instead, the text will be invisible when x is less than 0 minus the width of the text (See figure below). When that is the case, we reset x back to the right-hand side of the window, i.e. width.
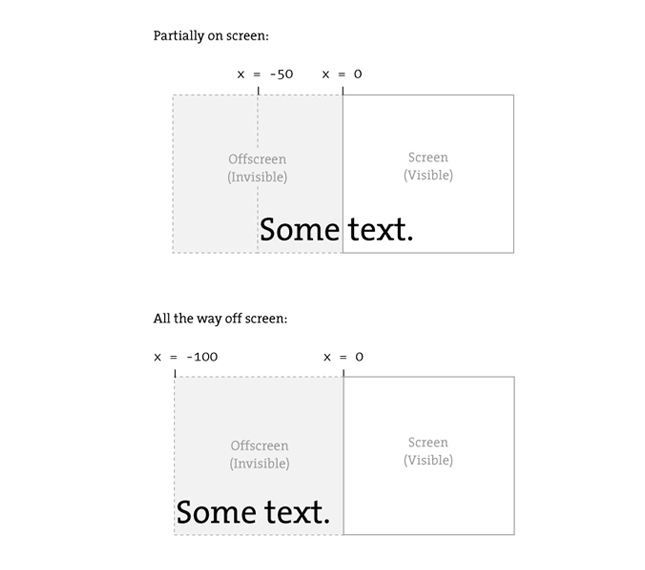
# If x is less than the negative width, then it is completely off the screen
w = text_width(headline)
if x < -w:
        x = width
Here’s the full example that displays a different headline each time the previous headline leaves the screen. The headlines are stored in a String array.
from p5 import *

headlines = [
        "Processing downloads break downloading record.",
        "New study shows computer programming lowers cholesterol."]

f = None # Global font variable
x = None # horizontal location of headline
index = 0

def setup():
        global f, x
        size(400,200)
        f = create_font("Arial.ttf", 16)

        # Initialize headline offscreen to the right
        x = width

def draw():
        global f, x, index
        background(255)

        fill(0)

        # Display headline at x  location
        text_font(f,16)
        text_align("LEFT")
        text(headlines[index],(x,180))

        # Decrement x
        x = x - 3

        # If x is less than the negative width
        # then it is off the screen
        w = text_width(headlines[index])
        if x < -w:
                x = width
                index = (index + 1) % len(headlines)

if __name__ == '__main__':
        run()
In addition to text_align() and text_width(), Processing also offers the functions text_leading(), text_mode(), text_size() for additional display functionality.
Rotating text
Translation and rotation can also be applied to text. For example, to rotate text around its center, translate to an origin point and use textAlign(CENTER) before displaying the text.
from p5 import *

message = "this text is spinning"
f = None
theta = 0

def setup():
        global f
        size(200, 200)
        f = create_font("Arial.ttf", 16)


def draw():
        global f, theta
        background(255)
        fill(0)
        text_font(f)                  # Set the font
        translate(width/2,height/2)  # Translate to the center
        rotate(theta)                # Rotate by theta
        text_align("CENTER")
        text(message,(0,0))
        theta += 0.05                # Increase rotation

if __name__ == '__main__':
        run()
Displaying text character by character
In certain graphics applications, displaying text with each character rendered individually is required. For example, if each character needs to move or be colored independently then simply saying…
text("a bunch of letters", (0,0))
will not do.
The solution is to loop through a String, displaying each character one at a time.
Let’s start by looking at an example that displays the text all at once.
from p5 import *

message = "Each character is not written individually."
f = None

def setup():
        global f
        size(400, 200)
        f = create_font("Arial.ttf", 16)


def draw():
        global f, theta
        background(255)
        fill(0)
        text_font(f)

        # Displaying a block of text all at once using text().
        text(message, (10,height/2))

if __name__ == '__main__':
        run()
We can rewrite the code to display each character in loop:
message = "Each character is written individually."

# The first character is at pixel 10
x = 10

for i in range(len(message)):
        # Each character is displayed one at a time
        text(message[i], (x, height/2))
        # All characters are spaced 10 pixels apart.
        x += 10
Calling the text() function for each character will allow us more flexibility (for coloring, sizing, and placing characters within one String individually). The above code has a pretty major flaw, however—the x location is increased by 10 pixels for each character. Although this is approximately correct, because each character is not exactly ten pixels wide, the spacing is off.
The proper spacing can be achieved using the text_width() function as demonstrated in the code below. Note how this example achieves the proper spacing even with each character being a random size!
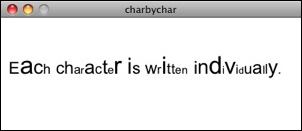
from p5 import *

message = "Each character is not written individually."
f = None

def setup():
        global f
        size(400, 200)
        f = create_font("Arial.ttf", 16)


def draw():
        global f, theta
        background(255)
        fill(0)
        text_font(f)

        x = 10
        for i in range(len(message)):
                text_size(int(random_uniform(12,36)))
                text(message[i], (x,height/2))

                # textWidth() spaces the characters out properly.
                x += text_width(message[i])

        no_loop()

if __name__ == '__main__':
        run()
This “letter by letter” methodology can also be applied to a sketch where characters from a String move independently of one another. The following example uses object-oriented design to make each character from the original String a Letter object, allowing it to both be a displayed in its proper location as well as move about the screen individually.
from p5 import *

message = "Each character is not written individually."
f = None
letters = []

def setup():
        global f
        size(260, 200)
        f = create_font("Arial.ttf", 16)
        text_font(f)

        # Initialize Letters at the correct x location
        x = 16
        for i in range(len(message)):
                letters.append(Letter(x, 100, message[i]))
                x += text_width(message[i])

def draw():
        global f, letters
        background(255)

        for i in range(len(message)):

                # Display all letters
                letters[i].display()

                # If the mouse is pressed the letters shake
                # If not, they return to their original location
                if mouse_is_pressed:
                        letters[i].shake()
                else:
                        letters[i].home()

class Letter:
        def __init__(self, x_, y_, letter_):
                self.letter = letter_

                self.homex = x_
                self.homey = y_

                self.x = x_
                self.y = y_

        def display(self):
                fill(0)
                text_align("LEFT")
                text(self.letter, (self.x, self.y))

        def shake(self):
                self.x += random_uniform(-2, 2)
                self.y += random_uniform(-2, 2)

        def home(self):
                self.x = self.homex
                self.y = self.homey

if __name__ == '__main__':
        run()
The character by character method also allows us to display text along a curve. Before we move on to letters, let’s first look at how we would draw a series of boxes along a curve. This example makes heavy use of Trignometry.
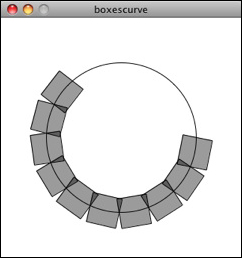
from p5 import *

f = None

# The radius of a circle
r = 100

# The width and height of the boxes
w = 40
h = 40

def setup():
        global f
        size(320, 320)
        f = create_font("Arial.ttf", 16)
        text_font(f)

def draw():
        global f, letters
        background(255)

        # Start in the center and draw the circle
        translate(width / 2, height / 2)
        no_fill()
        stroke(0)

        # Our curve is a circle with radius r in the center of the window.
        ellipse((0, 0), r*2, r*2)

        # 10 boxes along the curve
        totalBoxes = 10

        # We must keep track of our position along the curve
        arclength = 0

        # For every box
        for i in range(totalBoxes):
                # Each box is centered so we move half the width
                arclength += w/2

                # Angle in radians is the arclength divided by the radius
                theta = arclength / r

                with push_matrix():
                        # Polar to cartesian coordinate conversion
                        translate(r*cos(theta), r*sin(theta))

                        # Rotate the box
                        rotate(theta)

                        # Display the box
                        fill(0, 100)

                        rect_mode("CENTER")
                        rect((0,0),w,h)

                # Move halfway again
                arclength += w/2


if __name__ == '__main__':
        run()
What we need to do is replace each box with a character from a String that fits inside the box. And since characters all do not have the same width, instead of using a variable “w” that stays constant, each box will have a variable width along the curve according to the text_width() function.
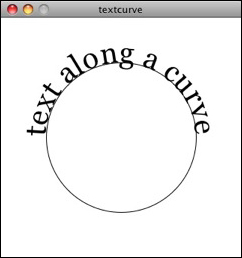
from p5 import *

f = None

# The radius of a circle
r = 100

# The width and height of the boxes
w = 40
h = 40

message = "text along a curve"

def setup():
        global f
        size(320, 320)
        f = create_font("Arial.ttf", 16)
        text_font(f)

        # The text must be centered!
        text_align("CENTER")

def draw():
        global f, letters
        background(255)

        # Start in the center and draw the circle
        translate(width / 2, height / 2)
        no_fill()
        stroke(0)

        # Our curve is a circle with radius r in the center of the window.
        ellipse((0, 0), r*2, r*2)

        # 10 boxes along the curve
        totalBoxes = 10

        # We must keep track of our position along the curve
        arclength = 0

        # For every box
        for i in range(totalBoxes):
                # Instead of a constant width, we check the width of each character.
                currentChar = message[i]
                x = text_width(currentChar)

                # Each box is centered so we move half the width
                arclength += w/2

                # Angle in radians is the arclength divided by the radius
                # Starting on the left side of the circle by adding PI
                theta = PI + arclength / r

                with push_matrix():
                        # Polar to cartesian coordinate conversion
                        translate(r*cos(theta), r*sin(theta))

                        # Rotate the box
                        rotate(theta)

                        # Display the box
                        fill(0, 100)

                        text(currentChar, (0,0))

                # Move halfway again
                arclength += w/2


if __name__ == '__main__':
        run()